Autocomplete is such an important and most frequently used web component either you develop a website or software. There are so many options to make autocomplete from the database but jQuery UI autocomplete is most used one. In this post, I'll show you a complete step by step process on how to make laravel autocomplete from database using jQuery UI.
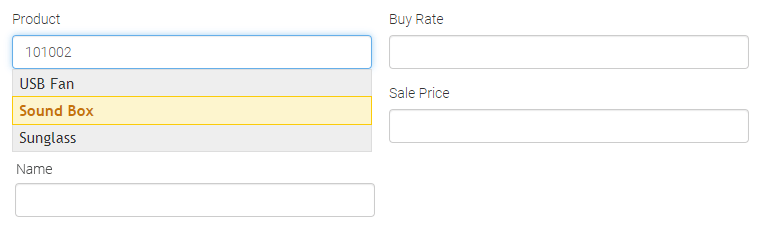
Suppose we have a product table with fields id, name, buy_rate, sale_price etc. In invoice creation, we need a autocomplete for selecting a product. After searching product by id, when we'll select a product it'll fill up Name, Buy Rate, Sale Price input automatically.
First, we need to add jQuery in our template header section.
<script src="https://unpkg.com/jquery@2.2.4/dist/jquery.js"></script>
Now add jQuery UI js file and jQuery UI CSS file at the bottom of your template.
<script src="https://code.jquery.com/ui/1.11.4/jquery-ui.min.js"></script>
<link href="https://code.jquery.com/ui/1.11.3/themes/smoothness/jquery-ui.css"/>
We need 2 routes. One for just showing our view where we'll build our autocomplete and another for JSON API service for feeding JSON to our jQuery UI autocomplete.
Route::get('admin/invoice/create','InvoiceController@create');
Route::get('admin/api/product','InvoiceController@getAutocompleteData');
Now we need to a JSON API service for our autocomplete. Let's do code in InvoiceController for making JSON API service and returning a view for autocomplete.
<?php

namespace App\Http\Controllers;

use App\Product;
use Illuminate\Http\Request;


class InvoiceController extends Controller
{
    public function getAutocompleteData(Request $request){
        if($request->has('term')){
            return Product::where('name','like','%'.$request->input('term').'%')->get();
        }
    }

    public function create(){
        return view('admin.invoices.create');
    }
}
Add a create.blade.php view in resources/admin/invoices directory and do markup for autocomplete.
@extends('app')

@section('content')

    <div class="container">
        <div class="row">
            <div class="col-md-4">
                <h4>Autocomplete from database</h4>
                <hr>

                <div class="form-group">
                    <label>Product</label>
                    <input id="product_id" name="product_id" type="text" class="form-control">
                </div>

                <div class="form-group">
                    <label>Name</label>
                    <input id="name"  type="text" class="form-control">
                </div>

                <div class="form-group">
                    <label>Buy Rate</label>
                    <input id="buy_rate"  type="text" class="form-control">
                </div>

                <div class="form-group">
                    <label>Sale Price</label>
                    <input id="sale_price"  type="text" class="form-control">
                </div>

            </div>
        </div>
    </div>

@endsection
Now we need to work in js part for doing autocomplete. You can do this code at the end of create.blade.php file with a script tag or you can use a separate file by using the reference of that.
$(function () {
           $('#product_id').autocomplete({
               source:function(request,response){

                   $.getJSON('?term='+request.term,function(data){
                        var array = $.map(data,function(row){
                            return {
                                value:row.id,
                                label:row.name,
                                name:row.name,
                                buy_rate:row.buy_rate,
                                sale_price:row.sale_price
                            }
                        })

                        response($.ui.autocomplete.filter(array,request.term));
                   })
               },
               minLength:1,
               delay:500,
               select:function(event,ui){
                   $('#name').val(ui.item.name)
                   $('#buy_rate').val(ui.item.buy_rate)
                   $('#sale_price').val(ui.item.sale_price)
               }
           })
})
Ok done. The final view code with Js part will be like below.
@extends('app')

@section('content')

    <div class="container">
        <div class="row">
            <div class="col-md-4">
                <h4>Autocomplete from database</h4>
                <hr>

                <div class="form-group">
                    <label>Product</label>
                    <input id="product_id" name="product_id" type="text" class="form-control">
                </div>

                <div class="form-group">
                    <label>Name</label>
                    <input id="name"  type="text" class="form-control">
                </div>

                <div class="form-group">
                    <label>Buy Rate</label>
                    <input id="buy_rate"  type="text" class="form-control">
                </div>

                <div class="form-group">
                    <label>Sale Price</label>
                    <input id="sale_price"  type="text" class="form-control">
                </div>

            </div>
        </div>
    </div>

    <script>
        $(function () {
           $('#product_id').autocomplete({
               source:function(request,response){

                   $.getJSON('?term='+request.term,function(data){
                        var array = $.map(data,function(row){
                            return {
                                value:row.id,
                                label:row.name,
                                name:row.name,
                                buy_rate:row.buy_rate,
                                sale_price:row.sale_price
                            }
                        })

                        response($.ui.autocomplete.filter(array,request.term));
                   })
               },
               minLength:1,
               delay:500,
               select:function(event,ui){
                   $('#name').val(ui.item.name)
                   $('#buy_rate').val(ui.item.buy_rate)
                   $('#sale_price').val(ui.item.sale_price)
               }
           })
        })
    </script>
@endsection
Hope this post will help you to make your won autocomplete for your website or web application. If this is helpful then please share with others.