You just finished Laravel basic? and looking for how to make RESTful API in Laravel Framework?. In this tutorial, We'll show you how to make a RESTful API with API authentication via Laravel 6. This is completely beginner tutorial post on How to make RESTful API in Laravel Framework.
RESTful stands for Representational state transfer and API is Application Programming Interface. Nowadays, the JSON response base RESTful API is most popular in modern application development. It is widely used in SPA (Single Page Application), Mobile application or any third party cross-platform environment.
Step 01: Laravel Installation
Install a fresh Laravel 6 application via composer command.
composer create-project --prefer-dist laravel/laravel restapiStep 02: Create database & update database details.
After successfully install Laravel 6. Create a blank database and update database details in .env file.
DB_CONNECTION=mysql
DB_HOST=127.0.0.1
DB_PORT=3306
DB_DATABASE=restapi
DB_USERNAME=root
DB_PASSWORD=
Step 03: Add api_token field on user migration file & run migration.
We'll use token for API authentication. So we have added another column in our user migration file to save every user token. Let's do that in database/migrations/2014_10_12_000000_create_users_table.php
public function up()
{
        Schema::create('users', function (Blueprint $table) {
            $table->bigIncrements('id');
            $table->string('name');
            $table->string('email')->unique();
            $table->timestamp('email_verified_at')->nullable();
            $table->string('password');
            $table->string('api_token', 80)->unique()->nullable()
                        ->default(null);
            $table->rememberToken();
            $table->timestamps();
        });
}
Now run migration command to create tables in the database.
php artisan migrateN.B: For API development testing, here we'll create a user via command line. To generate api_token in a real application for every user just put 'api_token' => Str::random(80) in your user creation code.
Step 04: User creation.
Let's create a user for API development test. Run command below
php artisan tinkerIn command-line write code below.
$user = new App\User();
$user->name ='Jhon';
$user->email ='jhon@gmail.com';
$user->password =\Hash::make('12345');
$user->api_token => Str::random(80)
$user->save();
Our basic setup completed. Now make some API endpoint that will serve our desire data for authenticated user only. Here I'll show you two API endpoints but all other things are some. If you understand these 2 API then you can move forward easily.
Step 05: Making a controller.
Make an API folder in app/Http/Controllers. So that all are API related controller in the same folder and organized.
Now make a controller for writing our API code.
php artisan make:controller API/UserControllerin this controller, write constructor and put this line intro constructor.
<?php

namespace App\Http\Controllers\API;

use App\Http\Controllers\Controller;
use Illuminate\Http\Request;

class UserController extends Controller
{
    public function __construct(){
        $this->middleware('auth:api');
    }

}
Step 06: Defining route.
Let's define our API endpoints into routes/api.php file. First, remove all code that exists before.
Route::get('profile','API/UserController@getProfile');
Route::get('user-list','API/UserController@getUserList');
Here two API endpoints are defined. These endpoints will available at
http://localhost:8000/api/profile
http://localhost:8000/api/user-list
Step 07: Code for API endpoints.
Let's do code in our controller for these 2 endpoints.
<?php

namespace App\Http\Controllers\API;

use App\Http\Controllers\Controller;
use Illuminate\Http\Request;

class UserController extends Controller
{
    public function __construct(){
        $this->middleware('auth:api');
    }

    public function getProfile(Request $request){
        $data = $request->user();
        return response()->json($data,200);
    }

    public function getUserList(){
        $data = App\User::all();
        return response()->json($data,200);
    }
}
If any user will try to access our API endpoints without API authentication by default it'll redirect to login route. Here we have to change the response for an unauthorized user. Open app/Exceptions/Handler.php and replace the render method.
public function render($request, Exception $exception)
{
    return $request->expectsJson()
               ? response()->json(['message' => 'Unauthenticated'], 401)
               : redirect()->guest(route('login'));
}
Step 08: Testing API.
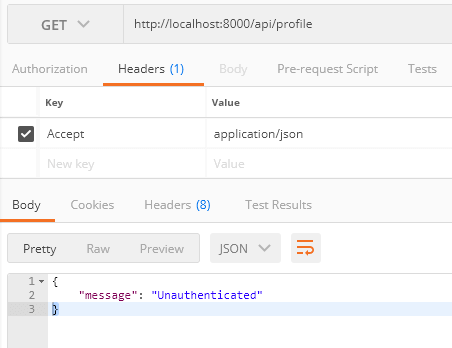
Let's test our API is working as expected or not. Our defined 2 endpoints will not accessible for an unauthenticated user. First, try to access the user profile without authenticating. Here we'll use Postman API testing chrome app. If you have not installed postman yet than install it first.
Request: http://localhost:8000/api/profile

Headers: Accept application/json
Output: We are getting "Unauthenticated" message because we did not authenticate the user with api_token. So the response is expected.
Now test with API token. Here API token sent with the request headers name with Authorization Bearer user_token_here . You can also sent API token with parameter name with api_token.
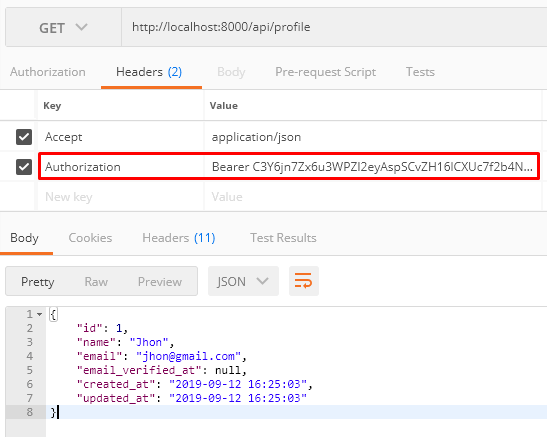
Now you can easily develop your desired API endpoints. If it's helpful to you please do not forget to share.